What is the Actual Source of Truth?
In the previous post, we described how the GraphQL schema is the source of truth for the data that’s sent between the backend and frontend.
Setting up Prisma
In our initial backend implementation, we hard-coded our data directly in our code to get up and running quickly. In a real application, our data would most likely be stored in a database that we’d access from our code using an ORM, which is a tool that enables you to easily access and manipulate data stored in a database from your application code without writing raw SQL. One ORM that’s become increasingly popular lately is Prisma.
When using Prisma, you define a schema that describes your data model. This schema will be used to automatically generate database tables, as well as client code that simplifies interacting with that data.
To get started, install Prisma as a dev dependency:
npm install prisma --save-devNext, run the Prisma init script to initialize it in the project.
npx prisma init --datasource-provider sqlite- We’re using a
sqlitedatabase to keep things simple, but Prisma has full support for other databases like PostgreSQL and MySQL.
The initialization script will create a new file called schema.prisma in a new prisma directory. This file is where we’ll configure our data model.
As a side node, Prisma has an excellent VS Code plugin that adds syntax highlighting, formatting, and other useful features when working with the schema.prisma file. I strongly recommend installing this plugin.
In that same file, add the following code to define a model.
model Book {
  id     Int    @id @default(autoincrement())
  title  String
  author String
}
What is a Prisma model?
A Prisma model is used to represent an entity in your application, and a database table will be created for each model defined in the schema.
This is a very basic model that matches the Book type defined in our GraphQL schema. We’ve added the @id annotation to the id property to indicate that the property is used to uniquely identify a Book instance. Additionally, we’re using the @default(autoincrement()) annotation to tell Prisma that we want it to handle generating the values for this field, and it’ll use an auto-incrementing integer value.
With our model defined, we can create a migration, which is the process by which our Prisma schema is synchronized to the database. Since this is our first migration and we only have a single model, the net effect of the migration will be the creation of a Book table in our database. Run the following command to execute the migration.
npx prisma migrate dev --name initTo see exactly what SQL operations were applied in the migration, navigate to the new migrations directory under prisma and select the migration.sql file in the uniquely named migration directory (it will be suffixed with the name provided in the migration command, init in this case). You’ll see a basic CREATE TABLE statement like below.
-- CreateTable
CREATE TABLE "Book" (
"id" INTEGER NOT NULL PRIMARY KEY AUTOINCREMENT,
"title" TEXT NOT NULL,
"author" TEXT NOT NULL
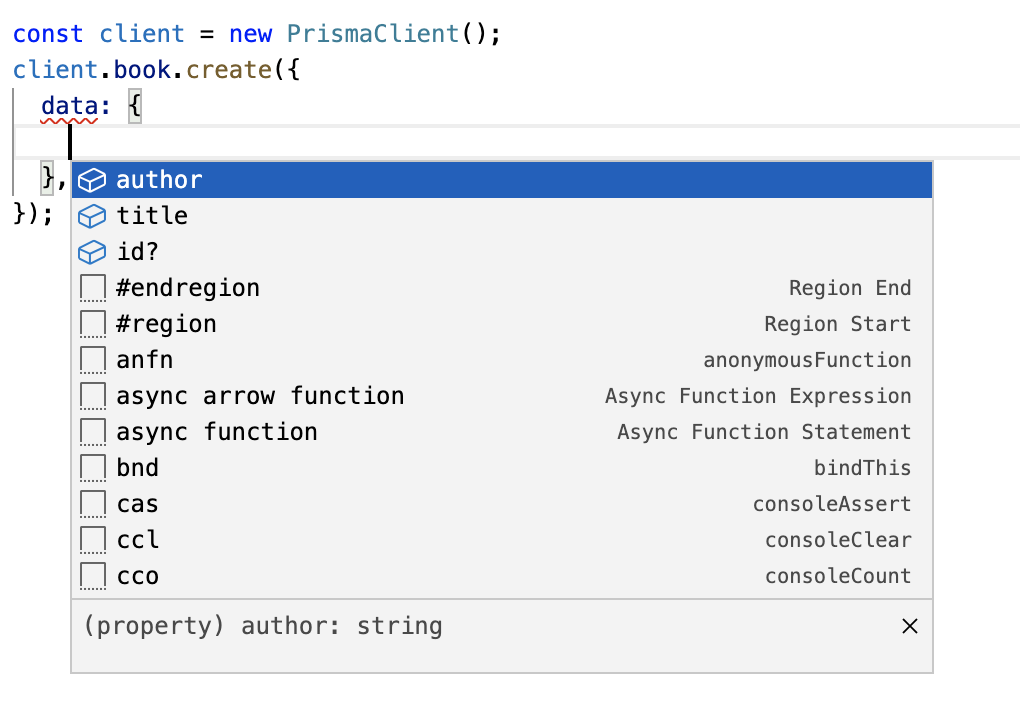
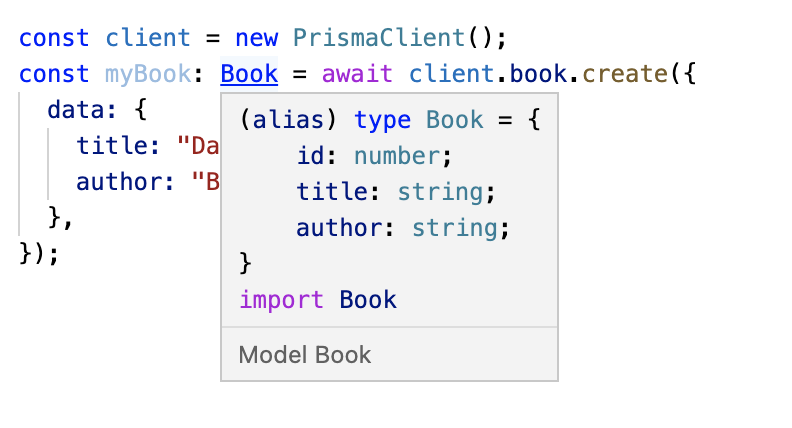
);Aside from dramatically simplifying the process of maintaining our database schema, Prisma also generates a custom client utility based on your data model. This client utility is used to interact with the database, and it is fully typed to your data model. So based on our single Book model, we’d be able to do something like this:
const client = new PrismaClient();

client.book.create({
  data: {
    title: "Dark Matter",
    author: "Blake Crouch",
  },
});
And because our Prisma client is fully type safe, we get great intellisense in our IDE, as well as TypeScript types for all of our models.
TypeGraphQL
The next tool we’ll add to our backend type safety toolbelt is TypeGraphQL, a package used to generate a GraphQL schema from resolver and model definitions. Before diving into the details of TypeGraphQL, let’s consider two approaches for developing a GraphQL API.
First Approach: SDL-First
The SDL (schema definition language) first approach is effectively what we’ve done up until this point. One of the very first things we did in the previous post was to define a GraphQL schema, which is currently assigned to the typeDefs variable in index.ts. From there, we would use that schema as the single source of truth for the rest of our application; our resolvers and models would adhere to the definitions specified in the schema. If changes are made to the schema, they would propagate down to the resolvers and model definitions in our application code (whether manually or with the help of a third party package).
Second Approach: Code-First
The code-first approach flips the first approach around; rather than deriving models and resolvers from a schema, we would first create our models and resolvers, then generate the schema based on our model and resolver definitions.
Prisma and TypeGraphQL promote a code-first approach; they have a great blog post that describes their reasoning in detail, and the TypeGraphQL documentation has a good description of the disadvantages of an SDL-first approach.
First, we create all the schema types in SDL. We also create our data models using ORM classes, which represent our database entities. Then we start to write resolvers for our queries, mutations and fields. This forces us, however, to begin with creating TypeScript interfaces for all arguments and inputs and/or object types. After that, we can actually implement the resolvers, using weird generic signatures.
The biggest problem is code redundancy which makes it difficult to keep things in sync. To add a new field to our entity, we have to jump through all the files: modify the entity class, then modify the schema, and finally update the interface. The same goes with inputs or arguments: it’s easy to forget to update one of them or make a mistake with a type. Also, what if we’ve made a typo in a field name? The rename feature (F2) won’t work correctly.
With TypeGraphQL, we create a GraphQL schema by creating resolver and model classes and adding decorators to annotate those classes, and a schema will be created from these classes. Thus, our single source of truth is our code, not the GraphQL schema.
Here’s an example of how we’d define our Book GraphQL object type using a class with TypeGraphQL decorators:
@ObjectType()
class Book {
  @Field((type) => ID)
  id: string;

  @Field()
  author: title;

  @Field()
  author: string;

  @Field({ nullable: true })
  description?: string;
}
Based on this class definition, TypeGraphQL would create a type that is identical to the existing Book type that’s defined in our GraphQL schema.
At this point, you might be thinking “That sounds great, but isn’t Prisma already generating types from our models? And doesn’t that mean we need to somehow keep our Prisma generated types in sync with our model classes that we’re using for TypeGraphQL?“. And yes, that’s absolutely correct. Which leads us to the third and final tool we’re going to introduce to close that gap: TypeGraphQL Prisma
TypeGraphQL Prisma
TypeGraphQL Prisma is a package that serves as the connective tissue between Prisma and TypeGraphQL. It’s a Prisma generator that creates TypeGraphQL type classes and resolvers from the Prisma schema. To see how this works, let’s install the packages and set it up in our project.
npm i class-validator reflect-metadata type-graphql@2.0.0-beta.1 typegraphql-prismaAdd the following properties to the tsconfig.json file:
{
  "emitDecoratorMetadata": true,
  "experimentalDecorators": true
}
Next, add the following to the schema.prisma file:
generator typegraphql {
  provider = "typegraphql-prisma"
  output   = "generated/typegraphql"
}
- This tells Prisma that we want it to use the
typegraphql-prismagenerator when it creates our client utilities, and that we want the generated code (resolvers, types, client, etc.) to be written toprisma/generated/typegraphql
Finally, we can run npx prisma generate to generate the types and classes from our Prisma schema.
Once the command finishes you should see three subdirectories in the specified output directory; enums, models, and resolvers. Open models/Book.ts and you’ll see a class that looks very similar to the example Book class from the TypeGraphQL section above.
With our resolvers and model types generated, let’s go back and revise our index.ts. We’ll do the following:
- Remove the
typeDefsvariable. - Remove the hard-coded data (that’ll come from our database)
- Remove the
resolversobject - Create our schema using the
type-graphqlbuildSchemafunction - Pass the generated schema to the Apollo Server constructor
Here’s what the index.ts file should look like after those changes.
import "reflect-metadata";
import { ApolloServer } from "@apollo/server";
import { startStandaloneServer } from "@apollo/server/standalone";
import { buildSchema } from "type-graphql";
import { resolvers } from "../prisma/generated/typegraphql";
import { PrismaClient } from "@prisma/client";

async function startServer() {
  const schema = await buildSchema({
    resolvers,
    validate: false,
  });

  const server = new ApolloServer({
    schema,
  });

  const { url } = await startStandaloneServer(server, {
    context: async ({ req, res }) => ({
      prisma: new PrismaClient(),
    }),
    listen: { port: 4000 },
  });

  console.log(`Server ready at: ${url}`);
}

startServer();
Note
Make sure that the reflect-metadata import is before the resolver import. You'll get an error if it comes after.
Run the server with npm run dev and navigate to the Apollo GraphQL sandbox at localhost:4000. Open the Schema pane on the left and you should see a set of new queries, mutations, objects, inputs, and more.
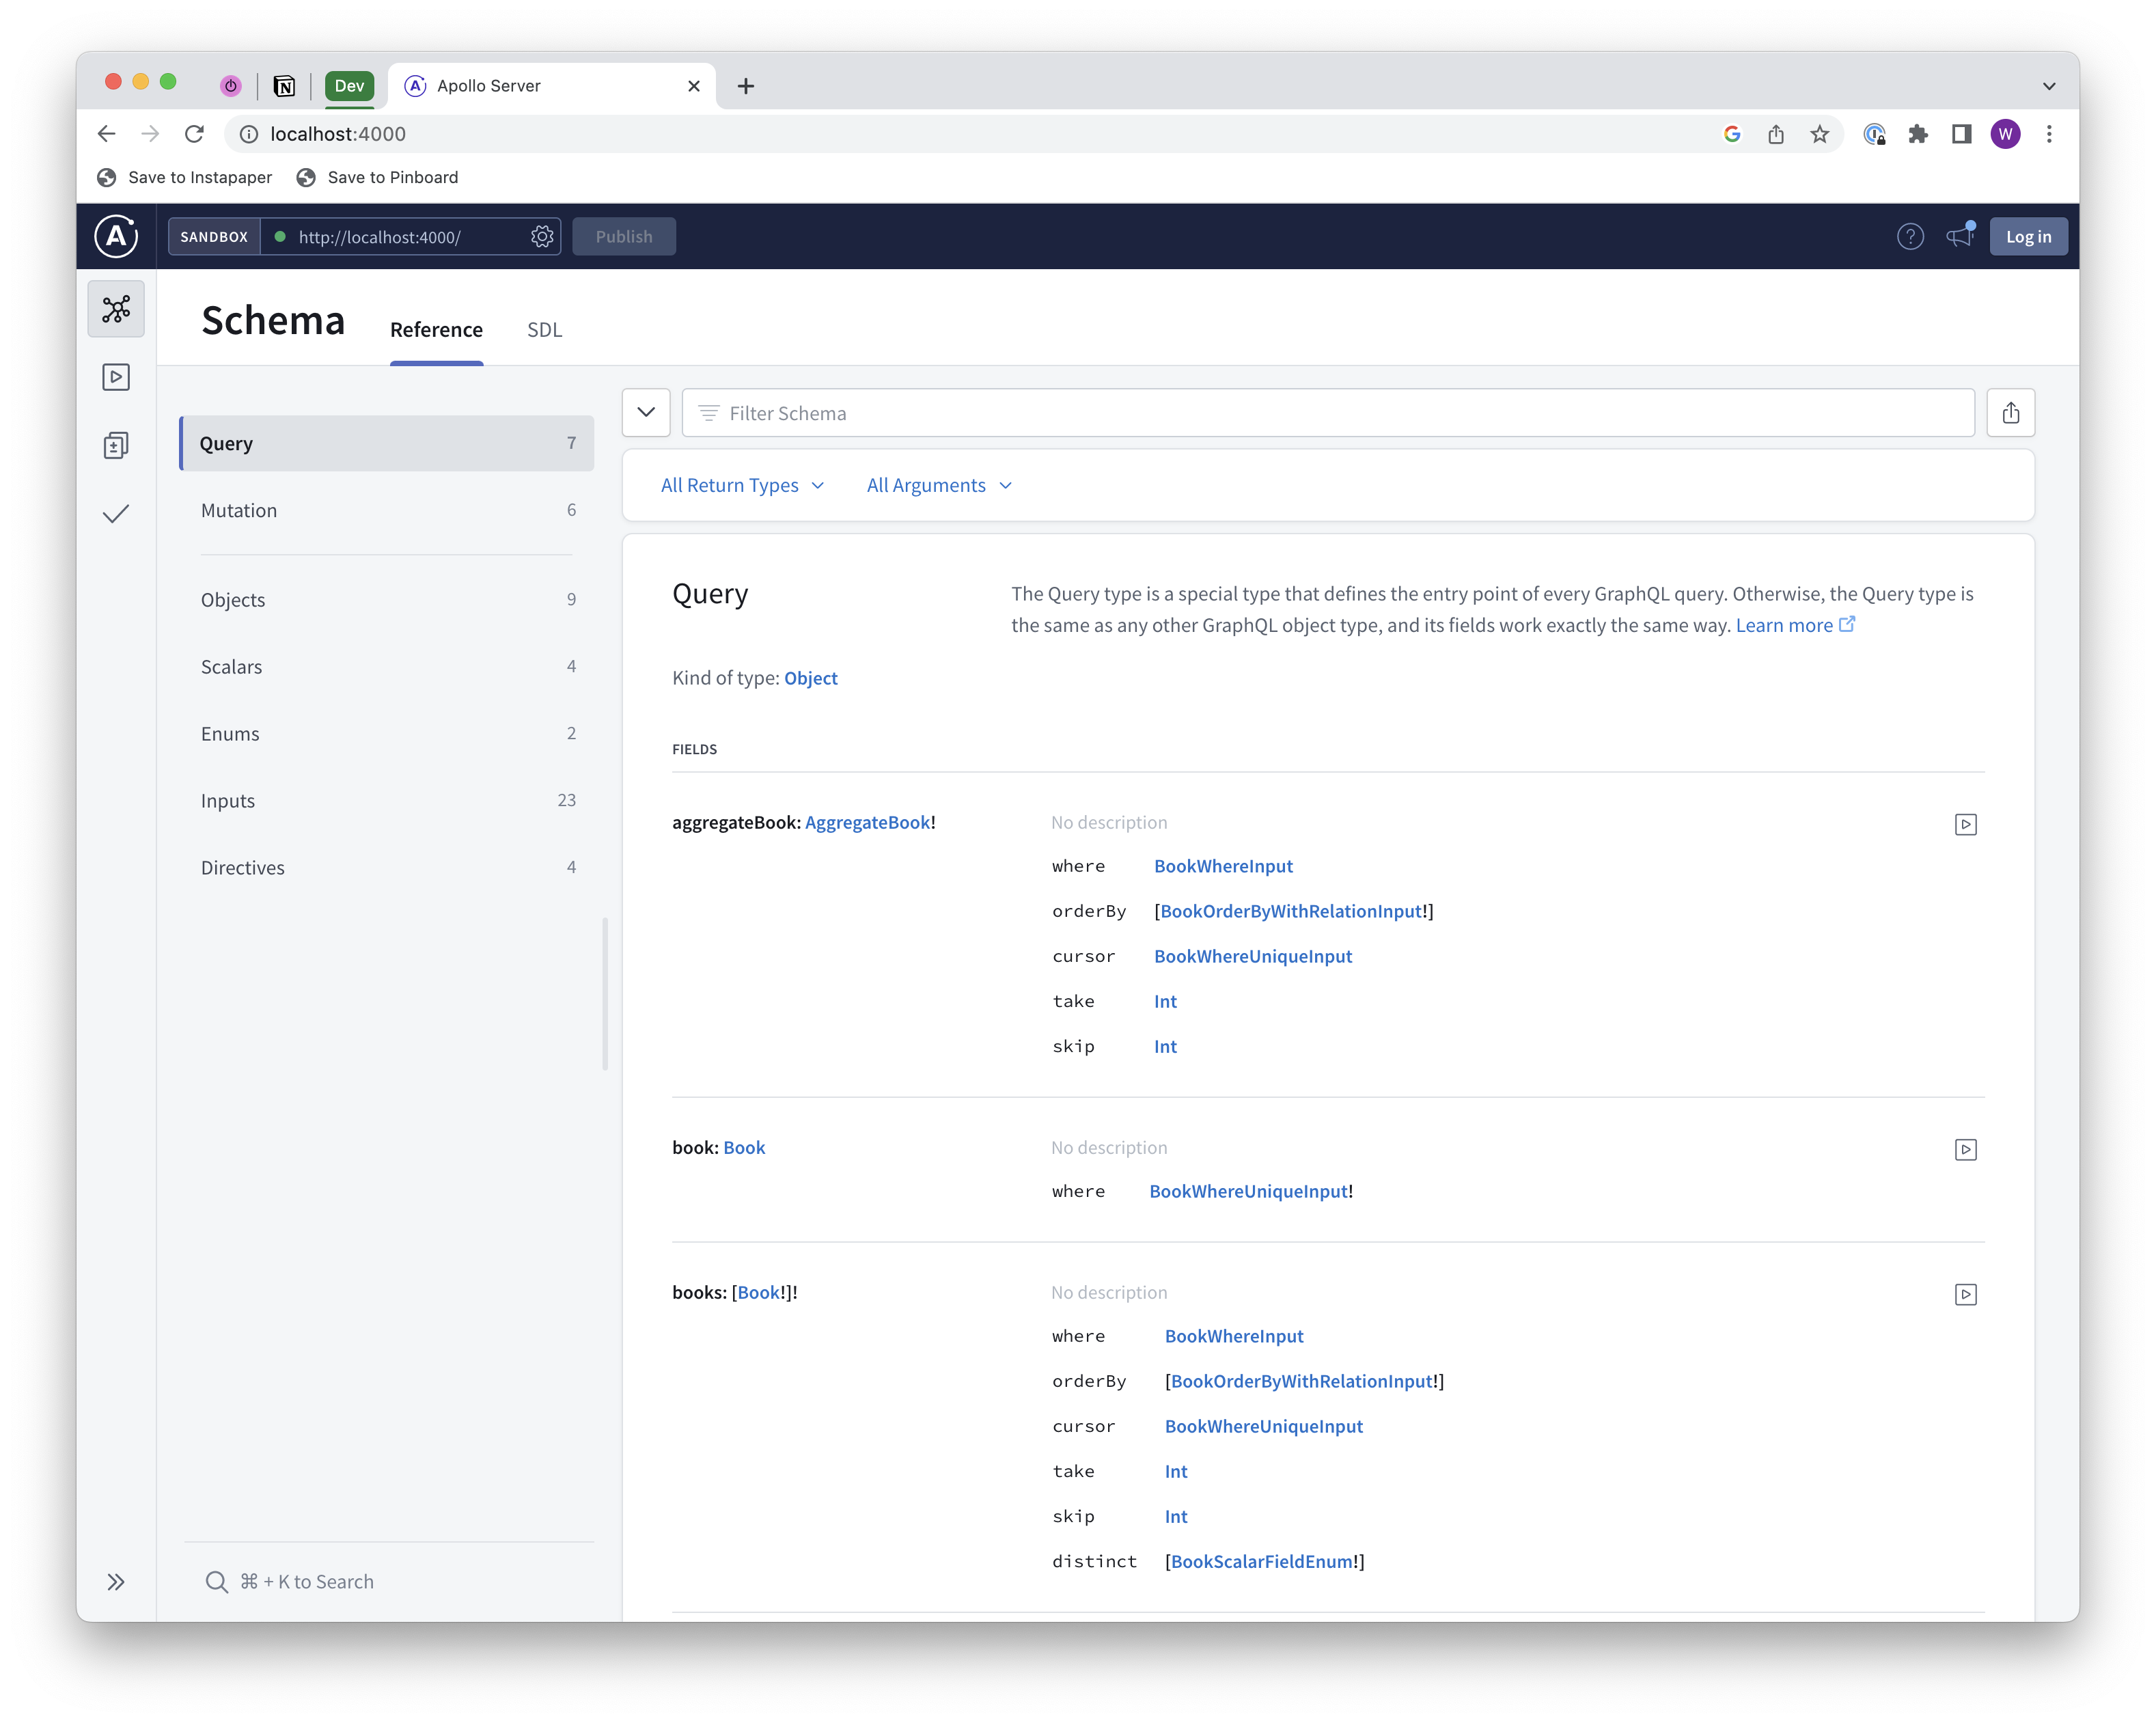 Where did all of this come from? The TypeGraphQL Prisma generator created them for us based on our Prisma schema! We didn’t have to write a single line of resolver or query code; the generator did the heavy lifting for us.
At this point, we can use this schema on the frontend and leverage the tools discussed in the first post of this series for client-side type safety. Any changes made on the backend would be automatically detected by the tooling we’ve put in place and our GraphQL schema would be updated, and we’d get client-side type errors if our frontend code no longer adheres to the schema.
Backend Summary
We’ve gone over a lot of information and introduced several new tools, so let’s summarize what we’ve covered.
One of the biggest changes we’ve made in this post is that we’ve switched from an SDL-first approach to a code-first approach. Our GraphQL schema is not the primary artifact that we modify to make changes to our data model; rather, it’s a byproduct of the code (model and resolver classes) that’s generated by Prisma, TypeGraphQL, and TypeGraphQL Prisma.
To compare the two approaches, let’s walk through the steps that would be required to add a new property to an entity; for example, adding a pageCount property to our Book entity.
SDL-First
- Update the GraphQL schema by adding the
pageCountfield to theBookobject type. - Update the
Bookmodel class in your backend codebase. - Update the resolver and query classes in your backend codebase to account for the new field.
- Add the field to the database table.
Code-First
- Update the
schema.prismafile by adding thepageCountfield to theBookmodel. - Run
prisma generateto automatically generate updated model and resolver classes. - Run
prisma migrateto automatically add the field to the database table.
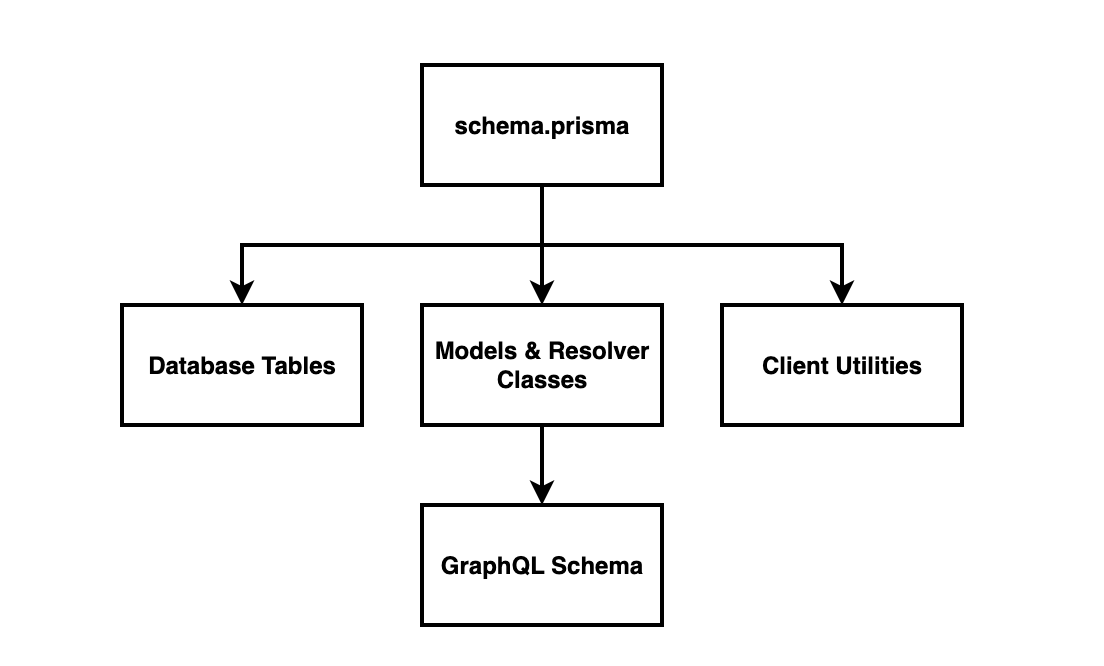
Our code-first approach is technically still a schema-first approach, but instead of the GraphQL schema it’s the Prisma schema. The key distinction between the two approaches, then, is how we create the GraphQL schema. The diagram below illustrates the data flow:
- We modify our data model in
schema.prisma. This is used to automatically do three things:- Update our database schema.
- Generate model and resolver classes (using the TypeGraphQL Prisma plugin)
- Generate the client utilities that enable us to easily access data (no TypeGraphQL here - this is just Prisma)
- The model and resolver classes drive the GraphQL schema.
With this backend approach, nothing changes on the frontend; we still use the GraphQL schema as the contract between the backend and the frontend, and we still use the GraphQL Code Generator to generate client-side types for our queries and mutations.
Resources
- GitHub repository - The
part-2branch contains everything covered in this post.