Overview
Over the past few months, I’ve spent a few hours on the weekends working on a small side project that I’ve never intended to actually release (beyond putting the source code on GitHub), but instead to explore some tools and frameworks that I’ve become increasingly curious about. This is the second non-trivial fullstack application I’ve built in my free time since moving from data engineering to software engineering, and the primary goal was to explore Next.js, arguably the most hyped frontend technology of the last year or two.
The application I built is pretty straightforward; it’s a bookmarking utility with basic functionality including tagging, public and private bookmark collections, and integration with external services like Instapaper and Readwise. While this is certainly nothing groundbreaking, it felt like a reasonable use case to try out some of the tooling that I’ve been interested in but haven’t had a chance to work with yet.
Tools Used
As mentioned, the primary goal of this project was to work with Next.js. I was especially curious to understand how GraphQL would integrate with Next.js, so a lot of the tooling is GraphQL-based. Below is a list of the rest of the stack that I’ll be reviewing in this post.
- Next.js 12
- GraphQL
- Apollo Client
- Apollo Server
- GraphQL Codegen
- TypeGraphQL
- NextAuth.js
- Prisma
- Tailwind CSS
- daisyUI
In the following sections, I’m going to be reviewing my experience with this stack and providing recommendations based on my experience.
Next.js
Overview
Based on the developer circles I follow, Next.js is increasingly becoming the de-facto React framework. The newly released React documentation lists Next.js as their first recommendation for a production-grade React framework (other recommendations include Remix and Gatsby, RIP create-react-app 🪦), and Andrew Clark from the React core team went so far as to say that the Next.js 13 release “is the real React 18 release”. With the increasing momentum behind Next.js, it was an obvious choice to test out and see what all the hype was about.
I couldn’t be more excited for this upcoming Next.js update. For Next.js users, I think of this as the “real” React 18 release — the release that finally makes features like Suspense and streaming SSR a practical reality. Congrats to the team! https://t.co/obDNA4AkAm
— Andrew Clark (@acdlite) July 20, 2022
Server Side Rendering
One of the core value propositions of Next.js is its intuitive server-side rendering model. Up until starting this project, I’ve exclusively worked with apps that require no SSR and strictly delineate between the frontend and backend. SSR was a pretty new concept to me, and it really blurred the lines between the responsibilities of the frontend and backend. I initially figured that since Next.js is a React framework, it also must be a frontend framework, but this line of thinking was incorrect. For all intents and purposes, Next.js is a fullstack framework.
Next.js is a Fullstack Framework?
Checkout Theo's talk (https://www.youtube.com/watch?v=W4UhNo3HAMw) on the backend capabilities offered by Next.js and how it compares to other frameworks. And if you don't already, subscribe to his YouTube channel.
It’s important to call out that just because Next.js has awesome SSR/fullstack capabilities, you aren’t required to use them. You might work in an environment where all backend code is written in another language (i.e. .NET, Java), or you might not ever need SSR. In those cases, you can certainly still use Next as a pure frontend framework with client-side rendering, and there are many other features of the framework that make this worthwhile (such as its routing system, layouts, TypeScript support, etc.). For a good, opinionated overview on how to choose a framework, check out this video.
For my application, there admittedly wasn’t a strong need for server-side rendering. Server-side rendering makes sense when you need to prioritize SEO, when inital page load performance is important, or when there’s complex rendering requirements that are better suited for a more powerful server. Although none of these applied to this application, I still wanted to experiement with SSR, so I came up with the idea to create public bookmark collections that would be server-rendered for performance and search-engine optimization. This couldn’t have been easier to implement, and although it only scratched the surface of Next.js’s SSR capabilities, it demonstrated just how powerful the feature is.
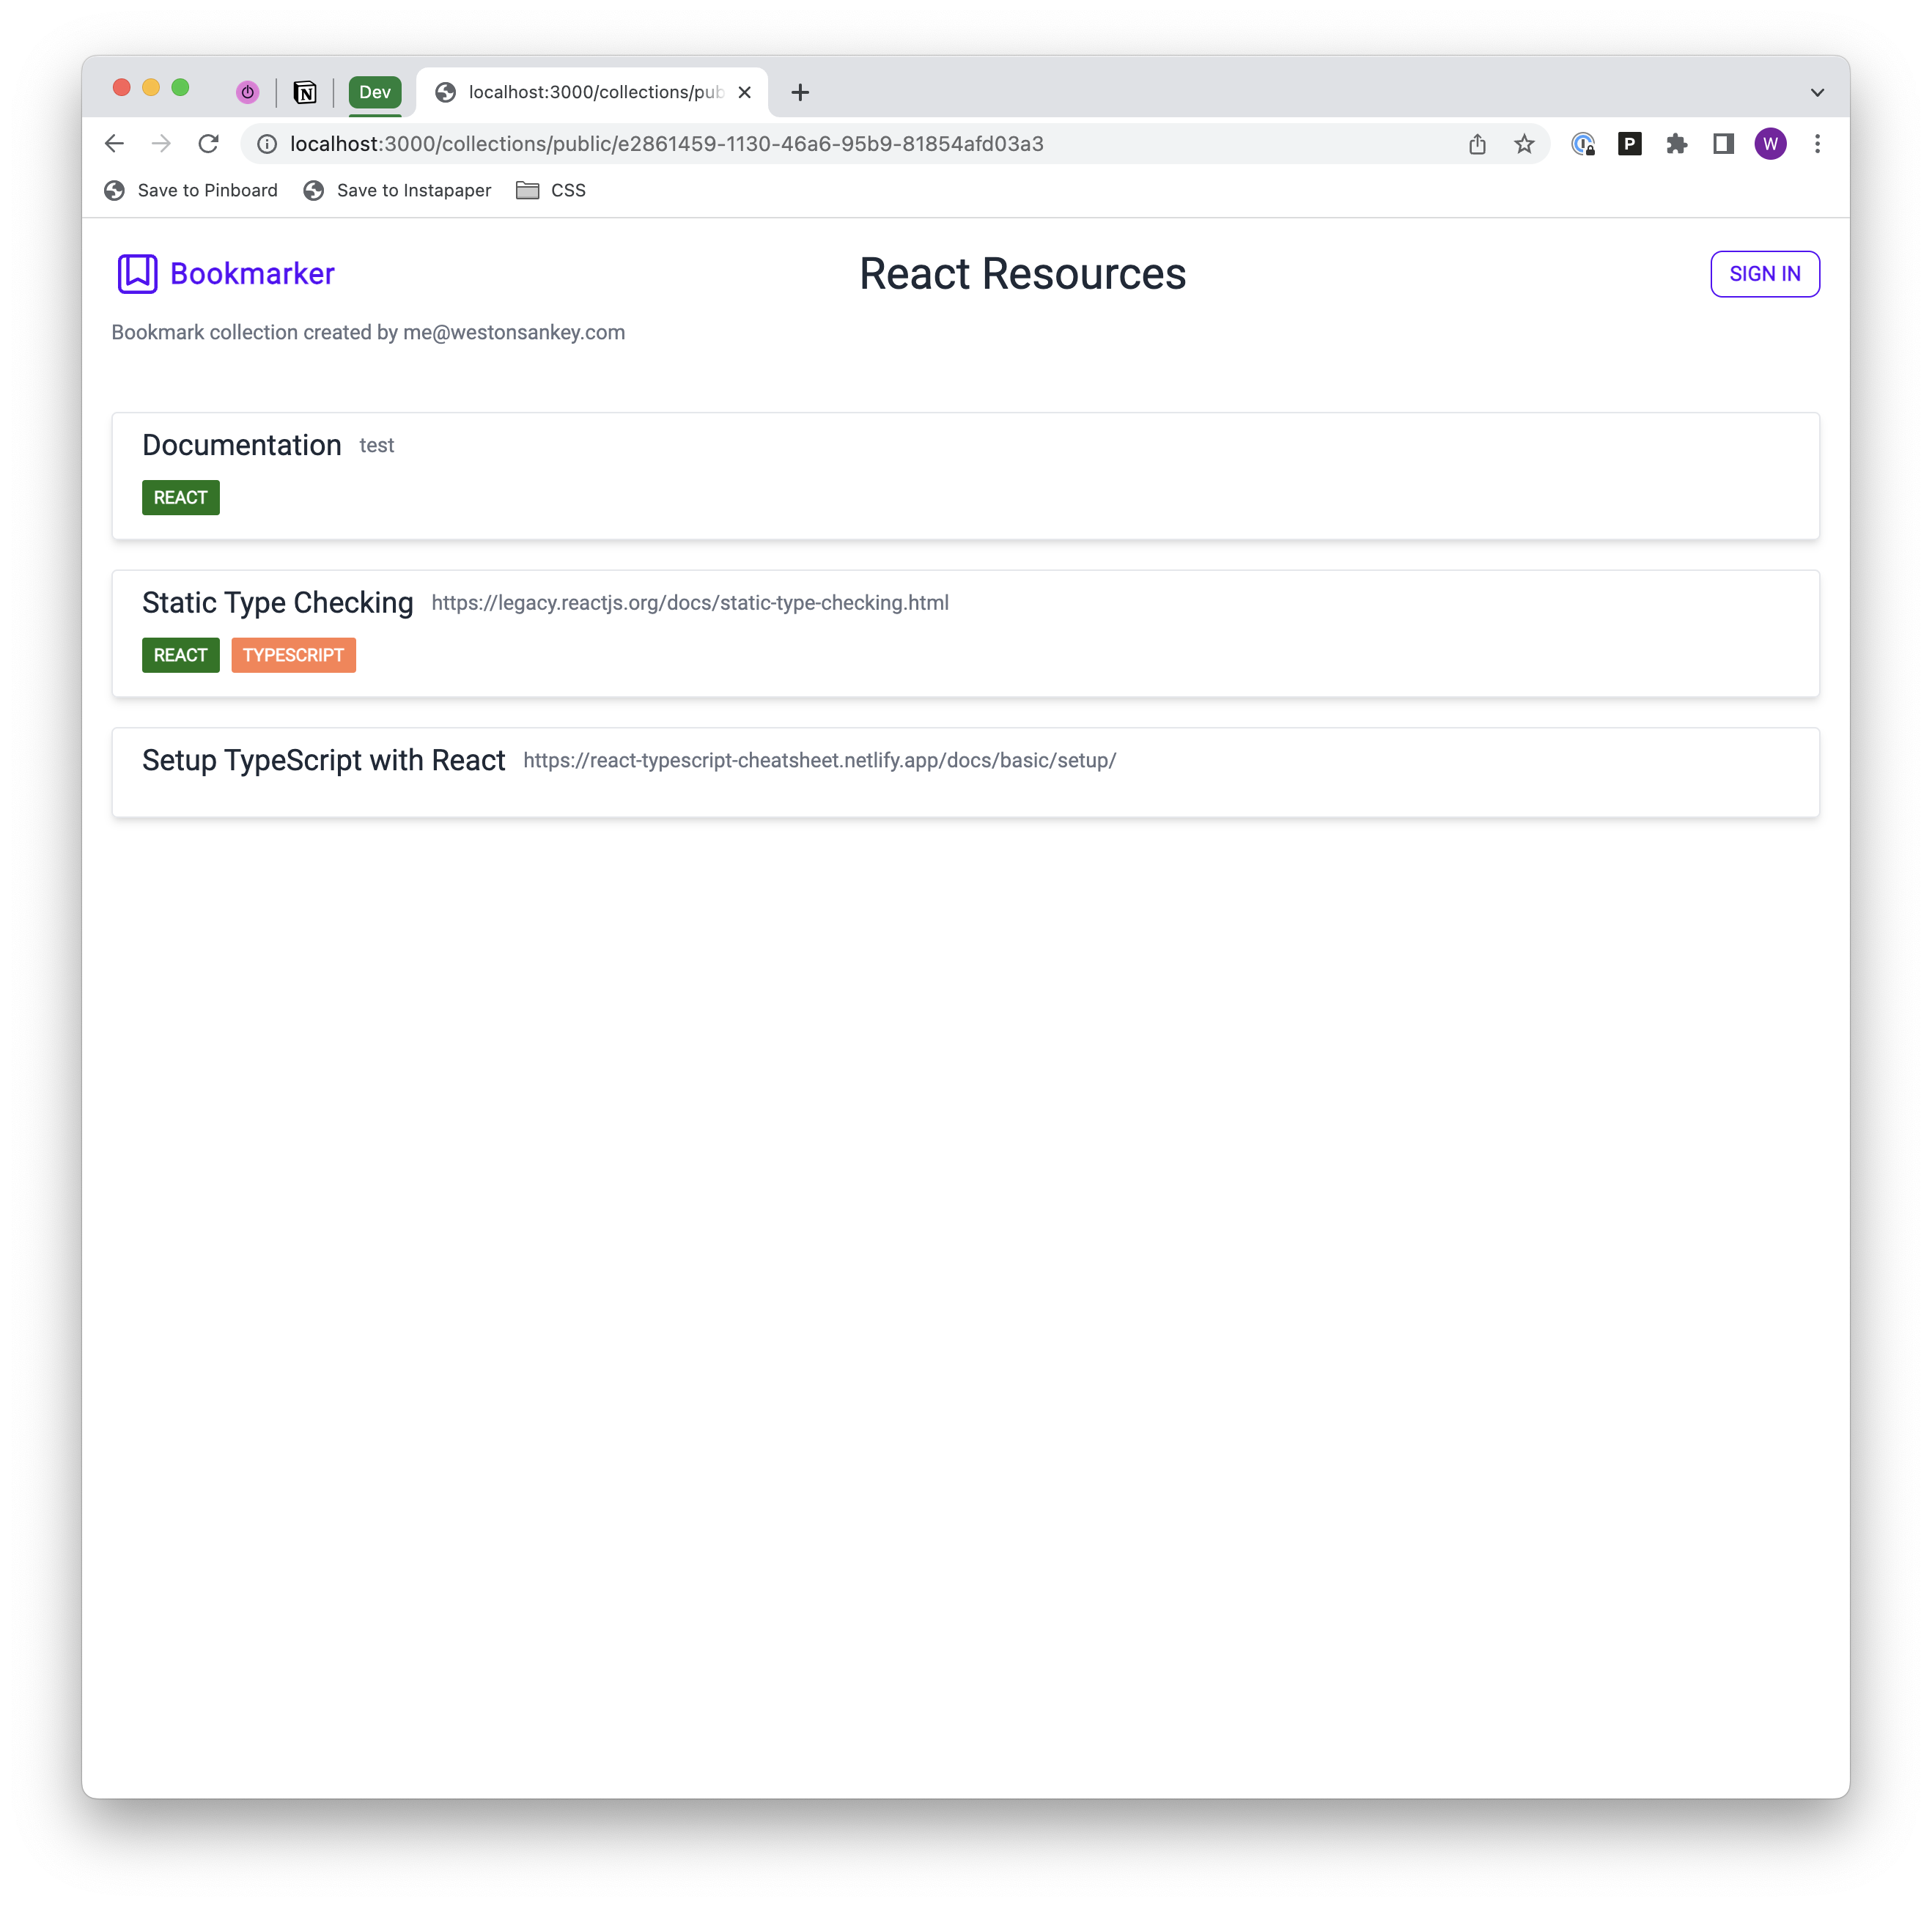
To see how this was implemented, view the source code here.
Routing
Next.js 12 vs 13
Next.js 13, which was released in beta late last year, introduces some fairly considerable routing changes. I used Next.js 12 in this project, so this post doesn't cover these changes.
Prior to this project, I had always used React Router to handle routing in applications. The core difference between React Router and Next.js is that React Router leverages configuration-based routing, while Next.js uses page-based routing. These two paradigms are fundamentally different and influence how an application’s codebase is organized, but they ultimately can result in similar organizational structures.
To briefly illustrate the differences between the two, let’s first consider React Router. With React Router, you’ll typically have a top-level file where routes are defined, and these routes correspond to React components that’ll be rendered when visiting the route’s path. This is a dramatic oversimplification that doesn’t scratch the surface of what React Router is fully capable of, but should be sufficient in conveying the core concept.
With Next.js, a route is defined by creating a file in the pages directory. The name of the file is the path for that route, and pages can be arbitrarily nested in directories to create the site structure. Again, this is another oversimplification that doesn’t touch on many other features, but that’s the main idea.
My sample application doesn’t have any complicated routing requirements; there are a few main pages the user will visit (/bookmarks, /tags, /settings, etc.), and some dynamic routes thrown in the mix as well. The Next.js routing mechanism made this extremely simple, but it would’ve been just as simple in React Router. I don’t have a strong preference between the two at this point, but I’m slightly partial to page-based routing based on my experience so far. It felt more natural and simpler to reason about where things live. You could certainly structure a project using React Router in the same way; for example, the following page/component structure could be used:
/pages
 |- BookmarkPage.tsx
 |- TagPage.tsx
 |- SettingsPage.tsx
and the router definition would correspondingly look something like this:
const router = createBrowserRouter([
  {
    path: "/bookmarks",
    element: <BookmarkPage />,
  },
  {
    path: "/tags",
    element: <TagPage />,
  },
  {
    path: "/settings",
    element: <SettingsPage />,
  },
]);
But this requires you and other engineers working with the codebase to adhere to this pattern without strict programatic enforcement.
Recommendation
Based on my experience with Next.js in this project, I’d absolutely use it again. The main reason I liked it was because of its flexibility. You’re not constrained to a single rendering mode; if there are parts of the application that would benefit from SSR, then those parts can use SSR while everything else uses CSR. Additionally, it comes out of the box with strong TypeScript support, Tailwind integration, and loads of other compelling features.
GraphQL
I’ve used GraphQL pretty much exclusively for all of my work and personal projects, so I don’t have a great basis for comparison with other options. Needless to say, my experience with GraphQL has been overwhelmingly positive. There are plenty of other articles explaining the advantages of GraphQL over REST, so I won’t re-hash them here.
What I continue to be impressed with is the ecosystem of tools that greatly enance the developer experience when working with GraphQL. In particular, this project leveraged GraphQL Code Generator and Apollo Client on the frontent, and TypeGraphQL and Apollo Server on the backend. I cover all of these tools in-depth in other posts, so check them out if you’re interested in learning more.
- http://localhost:3000/blog/2023-01-04-graphql-type-safety-1
- http://localhost:3000/blog/2023-01-14-graphql-type-safety-2
While there is a strong ecosystem of supporting tools, the fact that you need to use them at all could be seen as a disadvantage. I spent quite a bit of time getting up to speed on the libraries I used in this project, and there are now four extra non-trivial dependencies to manage. The main pain point with GraphQL in this project came with the Next.js integration, which is described in more detail below.
Next.js & GraphQL
As mentioned in the previous section, I love GraphQL and have had great experiences with it in other projects, but one of the biggest takeaways after completing this project is that I’d advise against using GraphQL with Next.js if you are also using Next.js as your backend.
GraphQL shines when your frontend is completely decoupled from your backend. For instance, the backend might be written in a completely different language. In this scenario, the GraphQL schema serves the contract to which the frontend and backend must adhere. By guaranteeing adherence to this contract, you can achieve fullstack typesafety (with the help of some open source tooling).
But if you’re already using Next.js as your backend, it introduces complexity by putting an unnecessary boundary between your client and server code (not to mention the overhead of maintaining additional dependencies). This boundary necessitates that you maintain two separate sets of type definitions for the same domain model; one for the backend and one for the frontend. Additionally, you need to use third-party tools to generate these type definitions, adding even more overhead. Here’s how this currently plays out the app:
- Define a Prisma schema, which is the ultimate source of truth for the domain model.
- Use the
typegraphql-prismapackage to generate TypeScript types, resolvers, and mutations. The resolvers and mutations rely on these types, and they’re also used to generate the GraphQL schema, which is the interface through which the frontend and backend communicate. - Define queries and mutations in the frontend code, and use
graphql-codegento generate TypeScript types based on the GraphQL schema and the defined queries and mutations.
The duplication occurs in steps 1 and 3; the TypeScript types generated based on the Prisma schema are effectively identical to the types generated by graphql-codegen. Is this duplication a big problem? No, not really. But it’s unnecessary, and we also have to deal with the type generation tools which is less than ideal.
Additionally, there’s not great support/documentation for using server-side rendering with GraphQL and Next.js (at least in Next.js 12). I have a post where I cover one possible approach, but the lack of resources on this topic leads me to believe that it probably shouldn’t be done unless absolutely necessary.
So what’s the best option, then? One technology that’s been getting a lot of attention lately is tRPC. tRPC offers end-to-end, automatic typesafety and can eliminate a lot of the overhead by effectively eliminating the client/server boundary that GraphQL adds. create-t3-app is a package that bootstraps a Next.js project with TypeScript and tRPC (along with some other tools). If I were starting this project again from scratch, I’d most likely use create-t3-app.
For a great walkthrough of when to use GraphQL vs tRPC, check out these videos.
Prisma
Prisma was by far the most impressive tool that I used in this project. If you haven’t heard of it before, Prisma is an ORM for Node.js and TypeScript that offers an incredible developer experience. Your data model is defined in a configuration file that’s kept in sync with the database through automatically generated migration scripts. It presents a layer of abstraction over SQL that allows you to focus on entities and their relations instead of dialect-specific syntax.
But that’s just the start. The real power of Prisma comes with its auto-generated client query builder. Based on the schema you define, Prisma will generate a type safe client library used to interact with your database. This allows you do write code like this:
const bookmarks = prisma.bookmark.findMany({
  where: {
    userId,
  },
  include: {
    BookmarkTag: {
      include: {
        tag,
      },
    },
  },
});
Which is roughly equivalent to the following SQL:
SELECT *
FROM
  bookmark AS B
  JOIN bookmark_tag AS BT ON B.id = BT.bookmark_id
  JOIN tag AS T ON BT.tag_id = T.id
WHERE
  B.user_id = <user_id>
The declarative, type safe client API makes it very simple to interact with the database once you get over the initial learning curve of how Prisma operates.
TypeGraphQL Integration
One of the great features of Prisma is its generator system. Generaters produce artifacts based on the Prisma schema; by default, all Prisma schemas are initialized with the client generator that generates the aforementioned client query builder code. I leveraged an open source generator, TypeGraphQL Prisma, to generate TypeGraphQL type classes and CRUD resolvers based on my Prisma schema.
This is incredibly powerful and significantly reduced the amount of boilerplate type and resolver code I would’ve otherwise had to write by hand. The integration was as simple as adding the following code to my schema.prisma file:
generator typegraphql {
  provider = "typegraphql-prisma"
  output   = "../graphql/server/generated"
}
Once the resolvers were generated, I could just pass them into the GraphQL schema builder and they’d be immediately available.
Of course the generated resolvers didn’t cover all scenarios, so I had to write a handful of custom resolvers for those edge cases. But I was still able to leverage the generated type classes in my custom resolvers.
Recommendation
I’d 100% use Prisma again, but I never actually looked into was the SQL queries that were generated by the client library. The CRUD requirements in this app were pretty basic, so I assumed that it was making sensible translations. But it would definitely be worthwhile to audit the generated code to make sure it’s producing a suboptimal query.
Styling: Tailwind & daisyUI
Styling the application was admittedly my lowest priority for this project, but I was interested in trying out Tailwind to get a better idea of how it works and if it’s something that I’d use in the future. If you’re not familiar with Tailwind, it’s a framework consisting a collection of utility classes that are used inline in your HTML/JSX. Here’s a small example from the Tailwind site:
<p class="text-lg font-medium">
  “Tailwind CSS is the only framework that I've seen scale on large teams. It's
  easy to customize, adapts to any design, and the build size is tiny.”
</p>
The two utility classes used in the p element translate to the following CSS:
font-size: 1.125rem;
line-height: 1.75rem;
font-weight: 500;
Advantages
Overall I really liked Tailwind and found that it’s primary value for me came from three key features: an intuitive API, incredible documentation, and reduced context-switching.
Tailwind’s utility classes generally just make sense and leave little room for guessing. You do need to get over the initial learning curve of mentally mapping your more frequently used CSS properties with their Tailwind equivalents, but this happens pretty quickly and is made much easier if you use the official Tailwind VS Code extension.
When you eventually come across something you don’t know how to do in Tailwind (or you just forgot how to do it), the documentation is extremely useful and is honestly some of the best developer documentation I’ve come across.
Finally, and this isn’t exclusive to Tailwind because there are other CSS-in-JS frameworks with similar ergonomics, but styling components inline with utility classes dramatically reduced context switching and accelerated development.
Disadvantages
The main thing I didn’t like about Tailwind is a little nitpicky, but it’s worth mentioning regardless. If you use more than a few utility classes on an element, the className property can get a bit difficult to read. Enabling word-wrap in VS Code helps, but it would be great if the Tailwind extension would auto-format the value into a multi-line string with one class name per line.
Component Libraries
If you’re coming to Tailwind from a component library like Chakra or Material UI, you may feel like it’s severely lacking in capabilities. It’s important to remember that Tailwind itself is not a component library; it offers utility class primatives that can be used to build your own component library. The tradeoff between using Tailwind and a component library is really centered around customization. Tailwind gives you unlimited options for customization, but you have to build the components. On the other hand, a component library is limited in flexibility and customization, but it comes with a ton of pre-built functionality that you don’t need to implement yourself.
Side note - Tailwind does offer a paid component library called Tailwind UI that’s very reasonably priced.
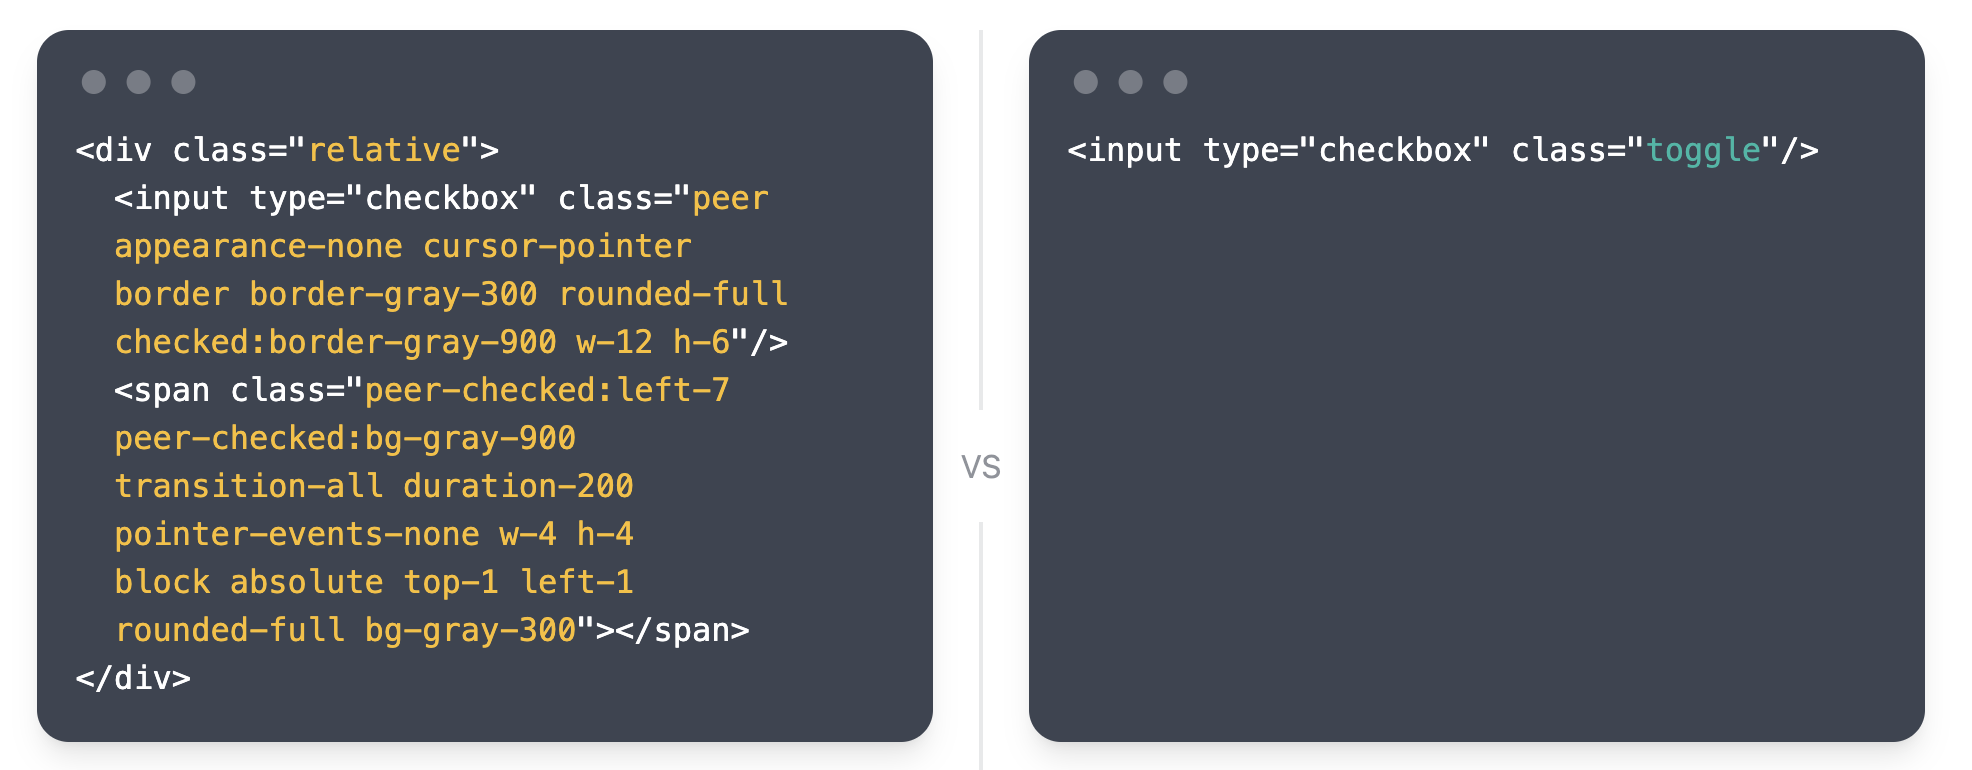
As a reasonable middle-ground between these options, there are several packages with pre-built, fully-customizable Tailwind components that can be used if you don’t want to implement them yourself. For this project, I used a few components from daisyUI. daisyUI is a plugin that adds additional utility classes for functionality not included in Tailwind. These classes can be thought of as higher-levels of abstraction over the core Tailwind classes. The website illustrates this by comparing a toggle implementation using native Tailwind vs daisyUI.
Recommendation
Whether or not I’d use Tailwind again ultimately depends on the project and team size. If I were independently building an app where styling was less of a concern (i.e. an internal tool), then I’d probably opt for a component library like Chakra. But if I were making something non-trivial and public-facing that I wanted to fully customize, then I’d absolutely use Tailwind.
Summary
I learned a ton working on this project and really enjoyed playing with some new tools. Here are my biggest takeaways:
- I’ll more than likely default to Next.js for all future React projects.
- GraphQL is awesome for a lot of use cases, but I probably won’t use it for personal projects anymore. Instead, I’ll probably start using tRPC.
- Building stuff just for the sake of building stuff is great. Not everything needs to be a revenue-generating side hustle.